Saturday, October 30, 2010

New Wallpaper!

    I know you guys have been waiting for a new tutorial, and we're hard at work at it. In the meantime, however, I decided to whip up a nice wallpaper, just for you devoted followers.

(Click to view it in its full glory)
Demensions: 1280x800
    Hope you guys enjoy it, I know I had fun making it!

Wednesday, October 27, 2010

New Author

    I've brought a member from SigResource, and a new friend of mine, to be an author on this blog. Nathan Burton, or Relapse, has so nicely obliged to translate the Photoshop tutorials I make into GIMP language, for all you GIMP users out there. I know there are some people that haven't converted to Photoshop, or simply prefer GIMP to Photoshop, and we don't want those folks to be left out in the cold.

    Each tutorial post from now on is going to be labeled at the title, so you know whether the tutorial is GIMP, PS, or both GIMP and PS compatible. So yeah, go ahead and drop a comment and give him a welcome, if you want. Thanks for reading!

Monday, October 25, 2010

Adjustment Layers: Gradient Maps


    Today, were going to be going over the adjustment layer, gradient maps. If you've never used gradient maps before, or you simply don't know what they do, they basically manipulate the color scheme of your image. Proper use of gradient maps can render very nice results, with very limited knowledge required. But, I'll delve into that knowledge later into the tutorial, so let's begin.


    1.  We need to be able to locate gradient maps first of all, so we'll begin there. There are quite a few different places where you can find gradient maps, I'm going to show you two places to find them.


    First location: On the bottom of the layers tab (Default location of the layers tab is in the bottom left-hand corner.), there is a row of functions for quick layer editing. In the very middle, there is a circle filled half black and half white, separated with a diagonal line. When you click on this icon, you will be shown a menu, from there you can distinguish gradient maps from the list of adjustment layers. Clarified below:

Layers tab

Drop-down menu

    Second location: The second place you can find gradient maps takes a little bit longer to get to in my opinion, but hell, what do I know, some people may prefer to get to it this way. In the header of Photoshop, you will see the 'Layer' tab, inbetween 'Image', and 'Select'. Click once and you should see a drop down menu, in which you can choose new adjustment layer, and then gradient map (Layer>New Adjustment Layer> Gradient Map). Clarified below:

Tool header

Drop-down menu #1

Drop-down menu #2


    2.  Okay, now that we have identified how to find gradient maps, it's now time to learn how to use them. You should see a window like this, somewhere on your Photoshop palette:

Gradient map selection base


    3. From this base, you can go with the default B&W gradient, or you can click on the black arrow (Pointing downwards) to get a larger selection of gradients. I selected the violet and orange gradient, and I will clarify the effects of it, starting with the 3rd image below:

Violet and orange gradient

Original image, without gradient (Stock from SigResource)

Image with violet and orange gradient


    4.  Well, as you can see, this isn't exactly a pretty sight. We got the violet and orange color scheme now, but it's way too overpowering. This is the part where layer styles and opacity adjustments come into play. By simply changing the gradient map layer style to color dodge, and reducing to the opacity to 38%, I got a nice toned contrast. Clarified below:

Image with updated layer styles and opacity

    
                        (Original image for comparison)


5.  The last and most important step to gradient maps, is to EXPERIMENT!! I don't know if I can stress this enough! I strongly encourage you to try out all kinds of different colored gradient maps in coordination with all sorts of different layer styles. There is such a variety of results that can be created from simply experimenting.

    So that concludes this tutorial, I hope that it was informative and helpful, even if only a little. I can also add that to get more unique results, you need to add more gradient maps to your image. I use gradient maps in almost every piece of art I make, and the amount of them can vary from 20 to 2. In the end it's all personal preference, as long as YOU like your outcome, that's what's important.

    Below I'm going to give three more examples of the stock I used in the tutorial, manipulated with gradient maps only.


    And before I finish this post, as I promised before, I'm going to leave a link to my home site SigResource. Again, this site is full of thousands of resources (Where I acquired this stock, infact.), tutorials, and incredibly helpful members. Feel free to sign up if you need criticism on your artwork, resources for your work, or just a friendly community to be with.


FIN

Sunday, October 24, 2010

Small update

    I wanted to make this update to acknowledge the fact that I finally hit 50 followers, and to inform you of what the next series of posts are going to be about. 


    If you read my last post, you might have seen a sentence that said I was going to be going of gradient maps in my next post. Well, I'm actually going to be going over each of the adjustment layers, not only gradient maps. 


    Also, I'm going to be placing a link to SigResource in each of my important posts from now on, in case any new readers to my blog are interested in joining a graphics forum, but don't know where to look.


    Anyhow, I figured I couldn't simply make a post without having something relevant to graphics in it, so I'm going to close this update with a showing of some of the recent tags I've made in the past week.


Pure
I made this with a majority of it being pentooling.

Ghost
I threw this together for a battle against a friend of mine, alj.

Riddick
Nothing too special here, just me experimenting with splatter brushing.

KillZone
I made this one in fear that I had been getting rusty. Gotta keep oiled up. ^-^

Faded
Made this one for a battle as well, although I can't remember against who exactly.

Rainbow
Mostly smudge here. 
(I'll make a tutorial on smudging at some point)

Secret Cavern
Mostly smudge here as well, I made this for a battle against a friend, TJFX.

Well, if you have any comments, questions, or suggestions, feel free to leave them in a comment below. Thanks for reading.

FIN

Saturday, October 23, 2010

Pentooling: Design

As you know in my last post, I did a fairly detailed tutorial on how to render using the pentool. Today, I'm going to be tutorializing another use for the pentool, which is design. Many artists use the pentool to obtain a certain grace and flow in their work that simply cannot be obtained with a tablet or mouse, and it is very useful in this matter.

This tutorial is going to cover how to create this:


From this:


The initial signature itself is very basic and limited pentooling wise; however it can open doors to a lot more advanced work. So, let's begin.

First off, whip out your pentool. Then, using the technique I spoke of in my last post on how to render, (click to make anchor, ctrl+click to move anchor) make a curvey line, like so:


(For this process, I originally zoomed in to 300% I believe.)


Next off, after you make the curvey line then connect it back around, finish off the connection, and you should see a gray line outlining the area we're going to fill. So, right click and select the option 'fill path...'. Then, on the contents are select color from the drop down menu and pick a color to fill the selection with. For this pentooling, I picked a fairly light peach color.

You should end up with something like this:


Now to emulate this same effect, you can simple duplicate the pentooling and place the duplicate layer under the original then reposition the angle of it correctly (ctrl+t) to get a nice effect. That's what I did for the tutorial. However, you can make a new layer under the original pentooling and do another shape instead, in case you're looking for a better feel of uniqueness.

Heres an example of what it looked like after I duplicated the pentooling, used a color overlay on the dups, and put a nice reddish outer glow on the pentooling:


Due to the fact I was in a hurry, I only put one other set of pentooling into the tag, (take note it only took me about 10 minutes to make this) using the same exact technique I used to make the upper portion of pentooling.

Here is the after effect:


Now the only thing I really did afterwards was add a few gradients to blend the colors together, add an extra portion to the right side of the tag, since I felt it was lacking. I won't give details on the gradient maps, since that will be the subject of my next post.

Here's the result I got, and the result you saw at the beginning of the tutorial:


Now before I end this tutorial, I think it would be fair to show an example of what dedicated pentooling can produce.


This piece 'free bird', was made by a friend of mine who goes by Idiom, or Jimmy. He has some truly amazing works he's made with pentooling, and he was nice enough to allow me to use this one in this post.

Idiom's deviantART page: http://mrjimmyboy.deviantart.com/

ALSO!

One more thing before I end the post, I wanted to make sure I left a link to SigResource, a site that has thousands of resources and tutorials. This site has helped me from when I very first started graphics, and it's full of nothing but helpful and friendly members. I strongly suggest dropping by and signing up if you need help, criticism, or just a friendly place to be a part of.


Fin.


Thursday, October 7, 2010

Pentooling: Rendering

Today, I'm going to be going over the very universal tool, the pentool. The pentool is very useful to graphic artists, and really anyone else who know how to use it, correctly that is. Some simple practice and good teachings can allow anyone to master the pentool, so to speak. Which in this post, I will try to produce said good teachings. 

First off, there are a couple important uses for pentooling, what I mostly use it for, is rendering. Rendering is the process of cutting a selected portion of an image out of a picture. Since rendering is my main use for the pentool is rendering, that's what the first part of the overview will cover. And before I start, I just want to say that rendering can be very difficult if you are trying to get a clean cut. For my work however; I like to have my renders as sleek and close to the edge as possible, so it's a very monotonous task for me.


For the purpose of this tutorial, (and for the good of my work ethic) I'm going to be rendering this very simple, easy-to-do comic page. 
(resized for tutorial)

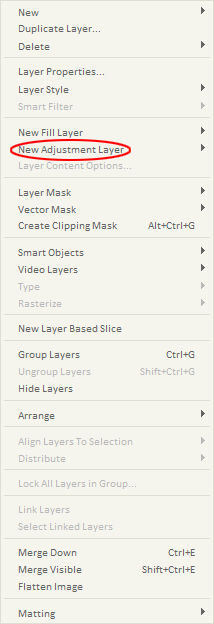
The first step to pentooling, is quite simply, getting a hold of it. Here's where you can find it on the toolbar:


As long as you have the default settings for the pentool as of now, you should be good to go. 

If not, you should probably make sure you have these settings checked: Paths, pentool, auto add/delete, and exclude overlapping path areas.

Next off, locate an area where you want to start the cut. In this case, it was by the left arm and the smoke trails coming off of his gun. I will clarify below:


Now depending how big your image is, and how precise you want the render to be, that will decide how much you want to zoom in on the image to start with the pentooling. I don't recommend zooming in over 500%, in fact that's how much I zoom in for ALL of my cuts, to get as precise as possible, no matter what.

So, once you get to your starting point, click with the pentool, and connect to another point around the outlines of what you're trying to render. I've found that rendering comics are a lot easier for rendering, because they always have a defined outer "shell", as you can put it, to pentool along.

Here is an image preview so you know if you're doing what you've done so far correctly.


Next, what you wanna do is click in the middle (or somewhere relative) of the line so you get an anchor point. From the anchor point, hold ctrl and move the point until you get a nice curve going along the outside edges of the desired render. You may also have to move the beginning anchor points you made, (ctrl+click) to get the desired result.

It should end up looking something like this:


Now continue these steps until you get a product like so:


Next off, you need to connect the pentooling at the anchor points that you started with, and the last one you just finished making. Once you complete the pentooling shape, you should get a solid, thin, grey line. Right click, and from the drop down menu, select "Make selection..." option. Another menu should pop up, in which you just keep the default settings select and click "OK". You should get the marching ants selection.


IMPORTANT: One thing I forgot to mention above, was that you need to make a new layer under your original image, and take the lock off of it before you can actually delete part of the image.

Then, simply hit the delete button on your keyboard, and voila! You have a nice section of your image rendered. 


If you're like me, you probably realized this isn't the funnest process in the world, but it's very useful skill to have, no doubt. If you enjoy this however, (some people render simply as a hobby) then you're going to love the next step, which is simply to apply all the steps to finish rendering your entire image.

Below I have my finished render, it took me about 10 minutes altogether to render the entire thing, although I've estimated it takes me about 1-3 hours to cleanly cut a detailed image.


So there it is, nothing too impressive or usable, but it was an easy cut. It's resized down a great amount from the original image, which was 1280x1818.


One extra note, this is not the only method to rendering. Some people I know pentool around the subject as a whole, then make the selection and invert it and press delete. The method I've shown above is my personal method, and is usually the best way to be precise and accurate, in my opinion (going by sections).

Anyways, I hope you learned something from this tut, if you have a comment, question, or request please let me know through the comments below. Thanks for reading!

FIN.

Saturday, October 2, 2010

Design Programs

In this blog entry, I'm going to explain what programs I will be giving tutorials and information on. In each section I will give a brief description and purpose or meaning that the program is mostly used for. Now when viewing this list, make sure you take into consideration that these aren't the only choice when it comes to making designs and artistic creations, these are simply the only programs I have experience in. So, with that being the intro, let's begin.


Adobe Photoshop: Photo-editing software

Description: Adobe Photoshop, or quite simply known as Photoshop, is the leading software in commercial bitmap and image manipulation. It is the most used, most famous (and infamous) product in Adobe's line of products.

Uses: Uses for Photoshop can vary from personal photo-editing, to top dollar logo design and creation. Many artists also use Photoshop as their go-to software for creating digital paintings.

Sources: You can purchase Photoshop off of Adobe's site, for a nominal fee. However, if you are savvy enough, you can find pirated versions all around the internet. Of course, I must clarify that I in no way condone the act of piracy, and I will not/do no support it.

Extra Details: The version of Photoshop I will be suing in all of my tutorials (until a newer version comes out) will be Adobe Photoshop CS5, the latest release of Photoshop Creative Suites. There are many useful plugins available for purchase all over the internet, to find them all you need is Google.


Adobe Illustrator: Vector graphics editor

Description: Adobe Illustrator is software that creates vector graphics. The program is used commonly for artists all over the world. It is a complete vector graphics environment that is used with other Adobe Creative programs. 

Uses: You can discover the ability to edit appearances (vectoring), work efficiently with the new guides and panels and also deliver to printers, developers and other applications much more easily than before.

Sources: Just like Photoshop, Adobe Illustrator can be purchased off of the Adobe home webpage, or found off of various other sources around the internet for free.

Extra Details: The latest version of this software is CS5, which is what I will be using for all of my tutorials.

Cinema 4D: 3D modeler and animator

Description: Cinema 4D is modeling, animation and rendering software developed by MAXON. It is recognized for its flexible interface and ease and simplicity of use and it is capable of procedural and polygonal/subdivision modeling, animating, lighting, texturing and rendering.

Uses: As stated above; Cinema 4D is used for 3D modeling and animation. Most of the use of Cinema 4D is recreational, but a lot of it is still used business related, as it is a very useful program to learn in coordination with Adobe After Effects.

Sources: You can purchase Cinema 4D off the MAXON home page.

Extra Details: I personally use C4D release 10, which is a little out-dated compared to it's predecessors, but still very useful nonetheless.

These are the main programs that I will be teaching, but I may dip into other software such as After Effects, or even non-graphic related programs such as FL Studio. If you have any questions or comments about the information on the programs I have listed above, please feel free to leave a comment and I'll get back to you as soon as I can.

Go here for Adobe's line of products, available for purchase: http://www.adobe.com/
Go here to purchase C4D and it's related products: http://www.maxon.net/

Graphic Design

First and foremost, I think we should start out with the basics. And what's more basic than the simple question, what is graphic design? Well, in a nutshell, it's a creative process. And although "graphic design" has a wide variety of definitions, it's basically the application of arts to compliment a more business related, or professional need. Graphic design has become more and more important with the advance of commercial technology, and it's only getting more important to have that 'new, sleek' design, or that 'unique gem' of an ad. 

I have found that learning graphics and all of its relative natures isn't the easiest process, and it's certainly not easy without somebody to help you along the way. So, in a way I have clarified the purpose of this blog, which is, to help YOU become closer and closer to becoming adept in the art of graphic design. In the following months I will be releasing series of tutorials, walkthroughs, and tips and tricks that will hopefully be helpful to anybody reading.